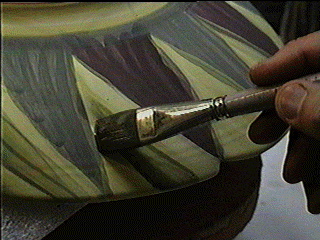
ART 191 - ADVANCED CERAMIC HANDBUILDING

STEPS IN THE CERAMIC PROCESS


CLAY PREPARATION

The first step in working in ceramics is the finding of a plastic clay body. In the past, potters had to dig their own clay from locally available sources as there were no other options. Some potters still dig their own clay and feel a valuable connection to the earth through this process. Native American potters of the Southwest traditionally make an offering for the clay they take from the earth to use for their pots. This process is quite labor intensive and is very difficult for urban potters today. Most buy commercially available clay bodies from one of the many ceramic suppliers in the area they live as shipping costs for something as heavy as clay can become expensive.


 WEDGING

Wedging is the process of mixing the clay by hand by rotating and pressing a clay ball on a table. The purpose is to thoroughly homogenize the clay and to remove all air bubbles. This is particularly important, as the presence of air bubbles in the clay will result in explosions in the kiln as the air pockets expand and burst. Your work is ruined, as is any piece near yours in the kiln. You will know if there is air in your clay if you see holes, like in Swiss cheese, when you slice through the clay with a wire.


 FORMING

After the clay has been thoroughly wedged, it may be formed by a variety of methods: slab, wheel, coil, pinch, and mold. These methods may be combined, or used singly. In this class, we will explore slab and wheel.


DRYING

When the clay bag is opened, the drying process begins. As clay dries, it loses water, becomes stiffer, and shrinkage begins. After forming, pieces you create should be wrapped in soft sheets of plastic (without holes) and placed on the shelves in the DAMP ROOM. The plastic will slow down (but not stop) the drying process, to ensure that when you return several days later, your pieces will still be workable. Be very careful as you wrap your work in plastic as you can distort the pieces easily. Be very, very careful in placing your work on the shelves in the damp room because you can easily destroy the work of other students. I recommend you write your name on the plastic so you can easily recognize your own work. Do not lift the plastic from the work of other students. This can distort or ruin their work also. If you need plastic, ask me for it. Under no conditions should you take plastic from another student's work. This will dry their work too fast, possibly causing cracking, and not allow them to continue working on a piece. Should you be caught doing this, you will be dropped from class immediately!


 LEATHERHARD

After your pieces have dried for a few days in the damp room in plastic, they will reach of stage of partial dryness referred to as leatherhard. This stage of drying is characterized by a loss of water through evaporation that results in the clay's stiffening and losing some flexibility. This is an excellent time to refine the piece: carving excess clay, adding handles or decorative elements, trimming the footring of a bowl, etc. This is the last chance you have to change the shape of the piece! It is very important that you be able to recognize this stage. Once the clay has dried beyond this point no further shape changes can be accomplished.


 GREENWARE

When a piece of pottery has dried completely it is referred to as a piece of greenware. This means it has lost all water through evaporation and has no flexibility. Bending it will break it. You cannot add anything to it. You cannot carve anything from it. You cannot do anything to it except break it! This is purely a passive state for the clay awaiting the first firing. After you have finished work on a piece, you must carry it from the damp room and place it carefully on the greenware racks. The work will remain there until enough pieces have accumulated to fill a kiln. Only work on the greenware carts will be fired; work left in the damp room will not be fired. EVER. It will simply sit in the damp room all semester. You must carry pieces to the greenware carts in order for them to be fired!


 BISQUE FIRING

After your work has dried to greenware on the racks, and enough pieces have accumulated to fill a kiln, the work is loaded into the kilns for the first of two firings. This firing is to approximately 1800 degrees F. This hardens the ware making it easier to handle without breaking during the glazing process. Clay fired at this temperature still retains its porosity however. The porosity of a material refers to its ability to absorb a liquid. The liquid part of glaze, in this case water, is absorbed by the porous bisque ware, and the glassy materials in the glaze are left deposited on the surface of the bisque ware. So, the bisque process is simply done to make glazing easier. The bisque firing takes a total of 3 days from start to finish. On day one, the kiln is loaded with the dry greenware and the kiln is lit, set at a low setting to dry the ware, and left overnight to slowly warm. Firing too fast during this early stage of the firing can easily cause the work to explode! On day two, the kiln is gradually turned higher and the temperature rises until the target temperature of 1800 degrees F. is reached. The kiln is then turned off and allowed to slowly cool. On day three, the kiln is opened, the bisque ware removed, and the pottery returned to the lab, where it is stored on shelving marked BISQUE WARE.


GLAZING

Now the glazing process can begin. The glaze, a mixture of ground glass, clays, coloring materials and water, is applied to the bisque pot by dipping, pouring, spraying, brushing, sponging, or some combination of these techniques. The footring of each piece must be free of glaze and the pot glued to a bisque fired 'cookie' made from a stoneware clay body. Pots are then placed on the glaze racks. The glazed pots accumulate until enough are there to fill a kiln.


 GLAZE FIRING

Again, the firing process is a three day affair. After the glaze firing temperature of 2350 degrees F. has been reached, the pots cool, and on day three, are unloaded and stored in the room in the wooden cabinet near my office. Once the ware is out of the kiln, we recommend you promptly take it home or store it in your locker. We do not have the storage room to warehouse all the work that will be produced! Remember, unsigned work will not be fired. This is the final step in the process for the vast majority of pieces produced. However, there is one final, optional procedure:


 OVERGLAZE FIRING

Sometimes, potters choose to do additional firings to achiever color and surface effects not possible in the glaze firing. These effects include lusters, china paints and decals. These overglaze techniques are fired at extremely low temperature (1300 degrees F.) and because of that, brighter colors and lusters are possible than can be achieved at 2350 degrees F. These are, loosely speaking, very low fire glazes that are melted atop the previously fired high temperature glaze. At this low temperature, the underlying glaze does not even melt, instead the luster, china paint, or decal melt onto the glaze and fuse, semi-permanently. This is the major disadvantage of this technique. The overglazes are not as permanent as high temperature glazes. Abrasion will erode this coating, and eventually, the overglaze will be gone or muted by time. Still, unusual and exotic effects are possible, and for this reason, potters are interested in this area. Some techniques, like china painting, often involve multiple overglaze firings, layering one color on top of another as complicated designs emerge


 GCC CERAMICS HOME PAGE

 ART 186 directory index

 Curriculum directory index

 Gallery directory index