| ART 192 - EARTHENWARE AIR BRUSH/STENCIL |
| The air brush is nothing more than a small device for spraying color. It consists of a container for the color, connected by a tube to a nozzle through which the color is mixed with air and sprayed. The air supply which pushes the color/air mixture is either a compressed air line or an air compressor. Here at the college we use a compressed air line, but in your own studios, you will probably use an air compressor. A stencil is a pattern or design usually made of masking tape or a paper cutout. MASKING TAPE RESIST Using wide masking tape on bisque, cover the desired area with rows of tape and burnish the tape down to eliminate any air pockets that may have become trapped. Next, draw your design with a regular pencil, using rulers or templates as necessary. Then, cut the design using a sharp exacto knife. Now you may air brush an underglaze or a glaze into these areas. The remaining tape will serve to retain the borders of the sprayed area. Then remove the remaining tape and spray the remainder of the piece with the covering glaze. There are countless variations on this procedure. Be experimental! PAPER STENCILS Cut a shape or shapes from stiff paper or stiff plastic sheeting. Hold the stencil in place against your piece and spray an underglaze or glaze onto the form. The stencil may then be moved and the process repeated. Using this method, underglazes, glazes, and oxide washes may be layered onto a piece creating patterns of depth and value contrast. NATURAL OBJECTS Similarly, natural objects such as leaves, flowers, shells, seeds, etc.., can be used to create designs with the air brush technique. Hold the stencil object next to your form and spray over it with oxides, slips, and/or glazes to create soft focus natural shapes. |
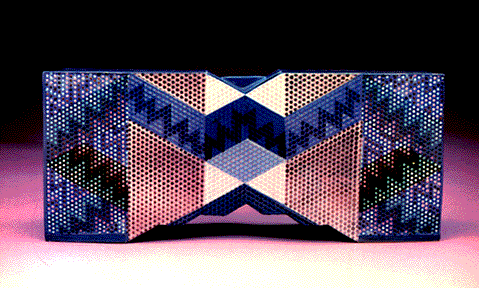
| MACHINE OBJECTS Other sources of stencils include using perforated sheet metal or machined objects to place against the ceramic form. Oxides and/or underglazes can be sprayed through these 'stencils' to create pattern. In making the funery urn below, perforated metal was used at several stages in the process. At the leatherhard stage, a piece of perforated metal was stamped into the slabs to create a raised dot pattern at the right and left areas of the slab. The central area was left smooth and untextured. The box was then assembled, dried and bisque fired. During the glazing process the same perforated metal was used as a stencil to spray underglaze through, creating the dotted patterns in the central areas. Masking tape was also employed to block off selected areas, creating the zig zag patterns. |
|
RESTING PLACE, funerary urn, 23" x 11" x 4" by ROBERT KIBLER |